Glissando Tips
One of my church pianist readers recently requested that I provide some helpful tips on how to play glissandos.
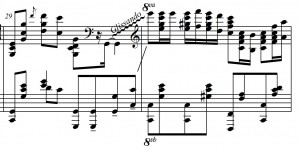
One of the trickiest technical moves in my How Great Thou Art piano arrangement is the glissando found on page four. (Shown below)
Glissando Tips
1. Notice the three tenuto (line marks) under the left hand in measure 29. These marks are pointing out the melody for the words “…then sings my…”. Emphasize the melody and keep the glissando volume in the background (little softer than left hand).
2. The right hand begins the glissando with the index finger immediately after the left hand plays the G octave with the first tenuto (line) mark. (It happens to be the same G as the left thumb just finished playing in the G octave).
3. Start the glissando with your right hand index finger…flipping the right hand over after the index finger starts. The index finger and 3rd finger will glide across the keys in an upside down, horizontal position. Once the index finger begins…the third finger will carry the brunt of the notes as you glide upward. The index finger will act more as a support and guide for the third finger. Just remember….the third finger is longer so it naturally has better contact of the keys.
4. Word of caution to church pianists: Glide across keys in a lightweight; relaxed fashion to avoid sore fingers 🙂
Visual Tips for the Glissando in How Great Thou Art
Tags: church pianist, church pianists, glissando, glissando tip, how great thou art, how to play a glissando
